Pythia8-4 Settings and Particle Data
1、设置 setting 和 particle data: pythia.readString(string);
string 的格式有两种,Settings 和 particle data,
Settings:
task:property = value
particle data:
id:property = value
or
id:channel:property = value
2、显示 setting 和 particle data:
pythia.settings.listAll();     // complete list
pythia.settings.listChanged(); // only changed ones
pythia.particleData.listAll();     // complete list
pythia.particleData.listChanged(); // only changed ones
pythia.particleData.list(id);      // only one (or vector)
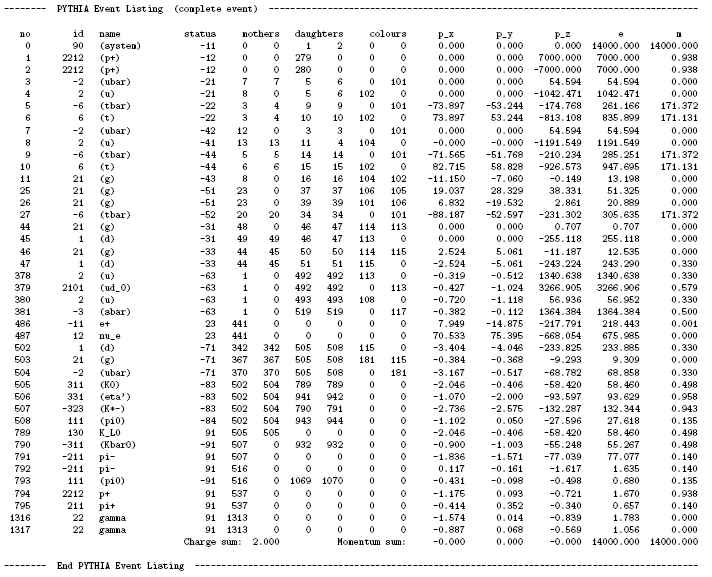
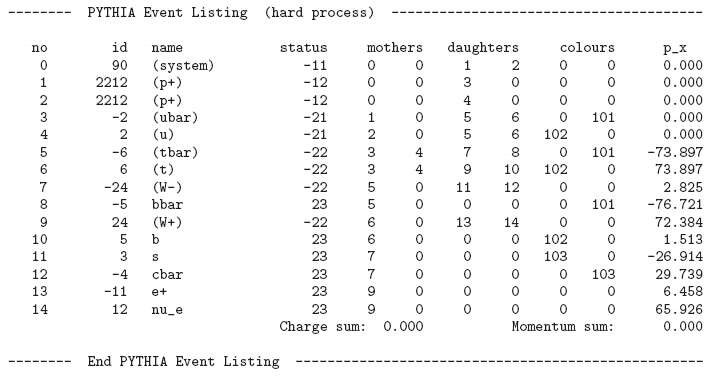
Pythia8-2 output
生成的结果可以用 pythia.event 和 pythia.process 查看。
1、mypythia.event is a vector (or a list) of Particle object.
mypythia.event.size();                                       // 0 < i < event.size().
mypythia.event.list();                                       // provide event listing.
mypythia.event.list(ostream& os);                            // 输出 list
mypythia.event.list(bool showScaleAndVertex, bool showMothersAndDaughters = false);
mypythia.event.list(bool showScaleAndVertex, bool showMothersAndDaughters, ostream& os);
                                                             // showScaleAndVertex: 显示每个量单位
                                                             // os (default = cout) ostream 的引用
mypythia.event.motherList(i), daughterList(i), sisterList(); // a vector<int> of mothers, daughters, sisters.
mypythia.event.iTopCopy(i), iBotCopy(i);                     // top or bottom “carbon copy”.
2、mypythia.process: hard subprocess, roughly like Les Houches
pythia.process.list() 的结果:
3、pythia.statistics() 统计各个过程的截面以及程序过程中的问题。
mypythia.statistics();
mypythia.statistics(bool all = false, bool reset = false);
                       //
Pythia8-3 Particle
Particlet 类
mypythia.event 是每次产生事例的粒子集合。
mypythia.event[i].id(); // id
mypythia.event[i].name(); // name, string 类型
mypythia.event[i].tau(); // 寿命
mypythia.event[i].m(); // mass in GeV
mypythia.event[i].m0(); // nominal mass
mypythia.event[i].mt(); // 横质量
mypythia.event[i].mt2(); // 横质量平方
mypythia.event[i].e(); // energy
mypythia.event[i].px(); // 动量 px。还有 py, pz。
mypythia.event[i].pt(); // 横动量
mypythia.event[i].pt2(); // 横动量的平方
mypythia.event[i].pAbs(); // 3-动量
mypythia.event[i].pAbs2(); // 3-动量平方
mypythia.event[i].theta(); // 极角
mypythia.event[i].phi(); // 方位角
mypythia.event[i].y(); // 快度
mypythia.event[i].eta(); // 赝快度
mypythia.event[i].spinType(); // 2s+1
mypythia.event[i].isCharged(); // 是否带电(布尔型)
mypythia.event[i].isNeutral(); // 是否中性(布尔型)
mypythia.event[i].charge(); // 电荷
mypythia.event[i].chargeType(); // 电荷*3
mypythia.event[i].colType(); // 0: singlet; 1: triplet; -1: antitriplet; 2: octets.
Pythia8-1 Pythia 的使用
Pythia 的使用:
1、在主程序的开头:
#include "Pythia.h"
或者
using namespace Pythia8;
2、生成对象:
Pythia mypythia;
生成的对象 mypythia 的一些属性或变量是按默认值初始化的,如果要改变一些设置或选项可以有两种方式(在mypythia.init()之前)
mypythia.readString(string); // 改变某个变量;

or

mypythia.readFile(fileName); // 批量改变变量;
3、接下来初始化生成子。mypythia.init() 有几种不同的输入方式
mypythia.init(idA,idB,eA,eB);
mypythia.init(idA,idB,eCM);
mypythia.init(LHAini*,LHAevent*);
mypythia.init(fileName);
mypythia.init();
一旦 init() 运行过后,所有的变量都会传递到各个过程中去,这之后的 mypythia.readString() or readFile()是没用的。
4、生成事例:
mypythia.next();
结果可以用 mypythia.event 和 mypythia.process。
5、统计。
mypythia.statistics();
得出子过程的截面以及问题的数目(aborts, errors and warnings)。
displaytag
1、安装
displaytag-1.2.jar
commons-lang-2.1.jar
commons-beanutils-1.8.0.jar
将这三个jar文件放到 WEB-INF/lib/ 下,并删除老版本的jar。
下载地址:
http://sourceforge.net/project/showfiles.php?group_id=73068
http://commons.apache.org/lang/
http://commons.apache.org/beanutils/
注意版本
2、使用
<%@ taglib uri="http://displaytag.sf.net" prefix="display" %>
<display: table name="list" pagesize="10" class="listcss">
<display:column property=" id" title="ID" sortable="true"></display:column>
<display:setProperty name="paging.banner.placement" value="botton"></display:setproperty>
</display:table>
fedora
1、f77: compat-gcc-34-g77
2、 opera9.63 中文输入:
/etc/share/opera/ini/standard_keyboard.ini 中的ctrl+space 删掉;
/usr/bin/opera 添加 export QT_IM_MODULE=SCIM
install
由于不是经常安装软件,所以参数都只记住了大概,现在罗列一下,以备需要时查看
tar jxvf file.tar.bz2
tar zxvf file.tar.gz
rpm -ivh file.rpm
配置Wap环境
1、iis配置Wap环境
在作为wap站点的属性-->Http头-->MIME映射中添加新的文件类型,具体如下:
关联文件名 内容类型
wml text/vnd.wap.wml
wmlc application/vnd.wap.wamlc
wmls text/vnd.wap.wmlscript
wmlsc application/vnd.wap.wmlscript
wbmp image/vnd.wap.wbmp
2、apache配置Wap环境
在httpd.conf中加入如下几行:
AddType text/vnd.wap.wml .wml
AddType image/vnd.wap.wbmp .wbmp
AddType application/vnd.wap.wmlc .wmlc
AddType text/vnd.wap.wmls .wmls
AddType application/vnd.wap.wmlsc .wmlsc
3、tomcat配置Wap环境
在web.xml中加入如下几行:(tomcat 6.x 默认已经支持)
<!-- Wireless Bitmap -->
<extension>wbmp</extension>
<mime-type>image/vnd.wap.wbmp</mime-type>
</mime-mapping>
<mime-mapping>
<!-- WML Source -->
<extension>wml</extension>
<mime-type>text/vnd.wap.wml</mime-type>
</mime-mapping>
<mime-mapping>
<!-- Compiled WML -->
<extension>wmlc</extension>
<mime-type>application/vnd.wap.wmlc</mime-type>
</mime-mapping>
<mime-mapping>
<!-- WML Script Source -->
<extension>wmls</extension>
<mime-type>text/vnd.wap.wmlscript</mime-type>
</mime-mapping>
<mime-mapping>
<!-- Compiled WML Script -->
<extension>wmlscriptc</extension>
<mime-type>application/vnd.wap.wmlscriptc</mime-type>
</mime-mapping>
使用 fckeditor 上传图片
需要一个图片浏览上传的功能,就是 fckeditor 那种,看了半天 fckeditor,也还是不知道怎么拿出来单独用。上网搜了下找到了这篇
rdesktop
$rdesktop IP
-f :全屏,ctr+alt+enter 全屏/窗口切换
-g 800x600+0+0 800x600 分辨率(注意: 是 x 不是 *),+0+0 窗口位置
-u username
-p pwd
其他:
-r comport:COM1=/dev/ttyS0,COM2=/dev/ttyS1 // 多个串口重定向
-r disk:floppy=/mnt/floppy // 将 /mnt/floppy 重定向为远程共享磁盘 'floppy'
-r disk:floppy=/mnt/floppy,cdrom=/mnt/cdrom,root=/,c=/mnt/c // 多个磁盘重定向
-r clientname=<client name> // 为重定向的磁盘设置显示的客户端名称
-r lptport:LPT1=/dev/lp0 // 将并口 /dev/lp0 重定向为 LPT1
-r lptport:LPT1=/dev/lp0,LPT2=/dev/lp1 // 多个并口重定向
-r printer:mydeskjet // 打印机重定向
-r printer:mydeskjet="HP LaserJet IIIP" // 打印机重定向
-r sound:[local|off|remote] // 声音重定向